USING NETSCAPE COMPOSER
|
Starting a New Page | Setting Page Properties | Creating Tables Adding Images | Creating Links | Formatting Text | Spell Checking Netscape Composer is part of the suite of applications in Netscape Communicator. It is available free and can be downloaded online. This page is based on version 4.7. The Windows and Mac versions of Composer are not identical. This page favors the Windows version. You may find some slight discrepancies because this page is intended to serve users of both, and at the same time to be as brief as the subject allows. Before using Composer check the preference settings. To set
Composer Preferences open the Edit menu and choose Preferences, then
click the Composer category in the dialog window.
There are several methods of starting a new Page. To
start from a blank page open the File menu and choose New; then choose Blank
Page (Blank on Mac OS). A Composer window containing a blank page opens. To
start from a template open the File menu and choose New; then choose Page,
From Template. In the dialog box select a template by typing the path
and name or click Choose File and use the dialog box to find the template
you want. Click Netscape Templates to go to a Netscape web site to choose
a template online. Open the File menu and choose Edit Page to use the
template for a new document. To start from Netscape's Page wizard you must
be connected to the Internet. From the File menu, choose New and then
choose Page, From Wizard. When the wizard opens, follow the instructions
to create a page that you can open in Composer.
To save a page open the File menu and choose Save or click the Save button in the toolbar. To view your page in a Navigator (browser) window open the File menu and choose Browse Page or click the Preview button (Navigator logo) in the toolbar. The Composer window remains open behind the Navigator window. The Page Properties dialog box allows for specifying page title and author, and other tags to help readers locate your document on the Web. To set page properties, open the Format menu and choose Page Colors and Properties (Page Properties in Mac OS). In the Page Properties dialog box click the General tab. Location is used to shows the location of the current document on your computer's disk. You cannot change this field. Title is the text that appears in the title bar of a browser window. Because one way some web search tools locate web pages by title you should choose a descriptive title using important keywords. Under Author type the name of the person who created the document. The name in Preferences will appear here when you create a new page. This information is also useful to readers using a web search tool. The Description is used to describe the document's contents. Many search engines display this in their search results. If the description is left blank those search engines may display the first 25 or so words in the document. The Keywords help searching services database your document on the Web. These are converted to META tags in the page <HEAD> section.
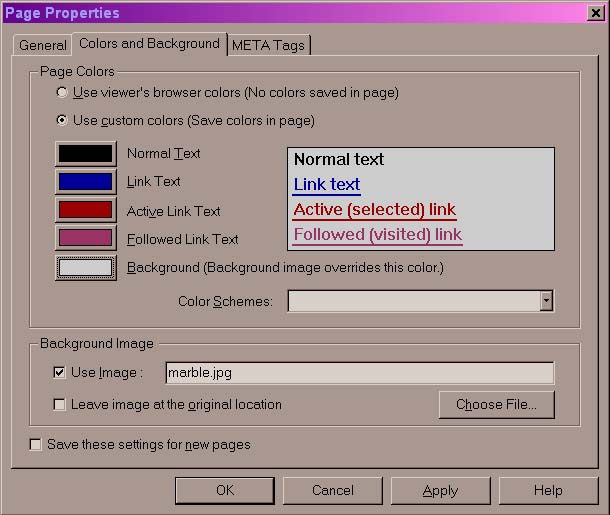
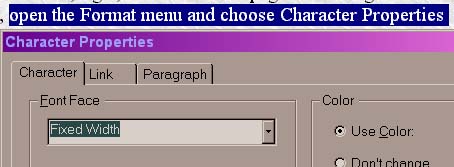
Page Colors and Backgrounds is a separate tab in the Page Properties dialog box. Here you specify a background color or background image for your page and choose default or custom colors for links and text. The selected page background may influence horizontal line and table boundary colors even when a background image overrides the background color. To set colors and backgrounds, open the Format menu and choose Page Colors and Properties. In the Page Properties dialog box, click the Colors and Background tab. The viewer's browser colors specified in the General preferences panel will be used unless you use custom colors. To specify color for text, links, and background, click the Use Custom Colors Button. Click the small colored rectangles to display the color palette and select a color. A sample of the selections updates to the right of the color swatches. Color Schemes lets you select a scheme from the list. Background images are tiled and override page background color. Click Use Image to specify an image as the page background, and type the name or click Choose File to find the image file on a disk. Before you link an image to your file you should have the image in the same folder, or you need to create a folder structure on your computer that mirrors your Web site. When you use a background image Composer copies the image into the same folder unless you click the Leave Image in Original Location option. If you click Save these settings for new pages, this option will apply your settings to any new pages. To format, highlight the page portions you want to format, open the Format menu and choose the appropriate selection. There is also a formatting toolbar with shortcuts. The paragraph options include styles. "Formatted" specifies use of a fixed width font. Most browsers remove extra spaces, tabs, and paragraphs in normal text. Using the Formatted style forces browsers to retain these. Formatting options include lists, including unnumbered, numbered, directory, menu, and description. Lists can also be nested. You can specify whether to align the selected paragraph at the left, right, or center of the page. Browsers may display different list formats differently. To change text color, style, and font, highlight the text you want to format, open the Format menu and choose Character Properties (Character info on Mac OS) and click the Character tab. Font faces select the font, or to have your page use fonts specified by a reader, select either Variable Width or Fixed Width.
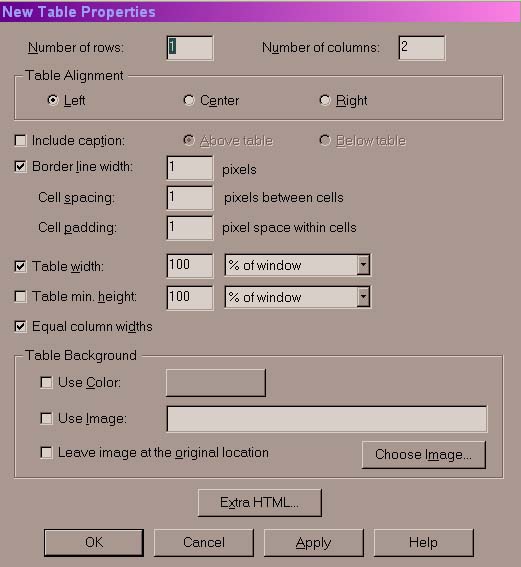
To select the size of the font use the menu of point sizes. In Windows you can use the General panel of the Composer Preferences dialog box to specify which type of menu you want, point sizes (8, 9, 10, etc.), or the relative scale (-2 to +4). To color your font click the color button. Remember, your choices only apply to the selected area of the page. You can specify default text color in the Colors and Background panel of the Page Colors and Properties (Page Properties on Mac OS) dialog box. The default text color applies to the entire page, except where you specify otherwise. Clicking the color button will display a colors dialog box. Click Other to choose a custom color. To select a style, such as italic, bold, underline, or nonbreaking use the style check boxes. To remove settings click the Remove Style Settings button. To preview your settings click Apply or click OK to make the changes. Horizontal Rules. To insert horizontal lines place the insertion point in the location where you want the line, open the Insert menu and choose Horizontal Line. To then specify the line's height, width, alignment, and shading, double-click on the line to open a dialog box. Inserting Tags. To insert HTML tags click where you want to insert the tag and open the Insert menu and choose HTML Tag. Type only one HTML tag and click Verify to have Composer check the HTML, then click OK. To edit a tag double-click its icon. You can use the Extra HTML dialog box for additional HTML attributes or JavaScript for an existing tag. To add a table place the insertion point where you want to place the table and choose Table from the Insert menu. The New Table Properties dialog box appears.
Set the parameters desired. To add to an existing table click where you want to add space, open the Insert menu and choose Table; then choose Row, Column, or Cell. To delete part of an existing table click in a row, column, or cell, open the Edit menu and choose Delete Table; then choose Row, Column, or Cell. The effect takes place at the location of the insertion point. You can change a table's caption, border, width, height, alignment, color, or the background of a table. To change an entire table, click anywhere inside it. To change a specific row or cell you must first place the insertion point inside the row or cell, then open the Format menu and choose Table Properties (Table Info in Mac OS). (Navigation keys are useful for moving the insertion point from cell to cell or row in a table.) Select the Table, Row, or Cell tab in the dialog box to make the appropriate changes, then click OK. The new settings override the settings used when the table was inserted. The number of rows and columns option is only available when you create a new table. In an existing table you must add rows and columns. Tables can be aligned within the document, left, right or centered, from the table tab of the dialog box. The Horizontal Alignment and Vertical Alignment options aligns the text within each row or cell and default leaves the alignment as it was when the table was created. The Include Caption check box inserts space for a caption, either above or below the table. Border line width is entered in pixels and determines the border around the table. Enter 0 for no border. No border displays as dotted outlines in Composer and creates an invisible table when the page is viewed in a browser. Cell spacing determines the space, in pixels, between cells and between cells and the frame. Cell padding sets the margins within each cell.
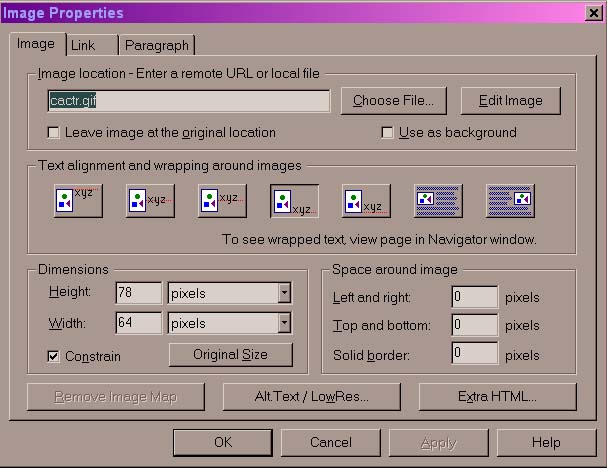
Upon completion of table property specifications click Apply to preview your settings, then click Close to accept, or to accept the changes without previewing click OK. To move, copy, or delete a table click in the table, then open the Edit menu and choose Select Table. Use the Edit menu to delete, cut, copy, or paste the selected table. You can add extra HTML and JavaScript to further define the table. Adding images is an important part of Web page creation. You can insert .png, .gif, and .jpg images into web pages. Place the insertion point where you want the image to appear in your document, click the Image button in the toolbar or open the Insert menu and choose Image, specify the image file and specify settings in the Images Properties dialog box. You can insert an image using cut and paste or drag and drop. When you do so the settings in Composer Preferences determine if a copy of the image will be placed in the same folder as the Web page when you save. To resize an image you can select it and drag the handles that appear at each corner. In Mac OS, QuickTime will convert a .pict file from the Mac OS clipboard to .jpg format.
The Images Properties dialog box can insert a new image or modify an existing image's options, such as links, alternate text, alignment, text wrapping, height, width, and spacing. You can edit images using an external editor if one is specified in Composer Preferences. Remember, if you subsequently move an image file from the specified folder location it will not appear in the web page. Image height and width can be specified in pixels. Click Constrain to maintain the image proportions as you alter one dimension. Click Original Size to undo any image size changes. You can specify the amount of space on the right and left, and to the top and bottom of an image. You can also specify a border in pixels or 0 for no border. If the image is a link the border assumes link colors. You can specify alternative text for readers who use braille readers, text-only Web browsers or who have graphics turned off. Otherwise, these readers obtain only placeholders. Text alignment and wrapping around images, the so-called the "xyz" buttons, determines how text is positioned next to an image. To actually see text wrap you must preview the page. Creating Anchors. To link within the same page place the insertion point in the position you want to link to, open the Insert menu and choose Target (also termed an anchor), type a name for the target in the edit box and click OK. An icon appears in the target's location. Select the text or image that you want to link to the target, open the Insert menu and choose Link. Follow the directions below. To link to other pages you can drag and drop a link from a web, history or bookmark page, or from mail and news windows. You can also create a link using the Link Properties dialog box by selecting the text or image you want to link, opening the Insert menu and choosing Link. There is also a link button in the toolbar. Type or paste the path and filename or remote URL. If you want to link to an existing target, select one from the list in the dialog box.. To remove a link select the linked text, then select Edit, Remove link. To link to an external Web page you need to enter the entire URL. To avoid errors or typos I recommend opening the page to be linked and copying the URL from the location bar. To spell check select a word or part of a document, or don't select anything to check the entire document, click Check Spelling and use the Check Spelling dialog box to correct misspellings and to edit or add words to the current dictionary. Click Stop when you are finished. The Word field displays the misspelled word. Just click a word in the Suggestions list or type a correction, and then click Replace or Replace All. To use a different spelling dictionary, click the pop-up menu and choose from the list. The Ignore and Ignore All options allow you to continue checking without changing the word (or all occurrences of the word). Click Learn to add the selected word to the dictionary. To edit your dictionary click Edit Dictionary to display a dialog box to add, replace, or remove words. The New Word field allows you to type the word you want to add to the dictionary; then click Add. In the Word field you can select a word, then Click Replace to replace it with the word you typed in the New Word field or click Remove to delete it from the dictionary. |
||||||
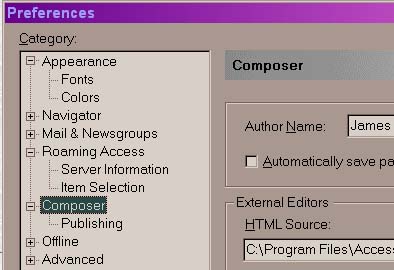 After you enter your name in the Author Name text box Composer will
place your name in the HEAD section of the HTML files you create. You
can also have Composer automatically save your document at a specified frequency.
You can choose external editors for text and images and designate a template
file. To save links and images with a page use the check box in the
Publishing Preferences dialog box.
 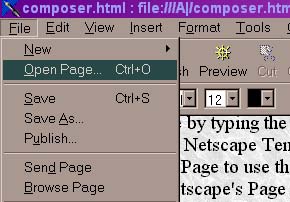 To
start from the page (or frame) you're currently browsing choose Edit Page
or Edit Frame from the File menu. The current Navigator window becomes a Composer
window containing the document you were viewing. To start from an page already
created, open the File menu and choose Open Page (Open Page in Composer on
Mac OS), type the path and name of the file you want to use, or click Choose
File to search for the file, click Composer, click Open. A Composer
window will open containing the specified file.

