|
POTTERY I Glaze Formulas: Cone 10 | Cone 6/7 | Raku
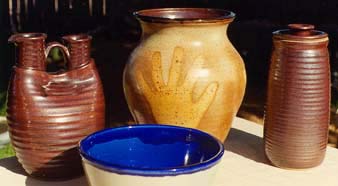
I enjoy doing high-fire and raku-fire of porcelain and stoneware, using wheel-thrown, slab-rolled, slip cast, and combined methods. I first began creating high-fired, wheel-thrown pottery in the late 1970's. Here follow two images of a few of my first pots. They were cone 10 reduction fired in a 70 cubic foot down draft kiln at Thurman Street Pottery, in Portland, Oregon.
This page discusses several ceramic techniques. After a long hiatus, I started creating pottery anew in the 1990's at Mesa Community College, including the cone 7 stoneware and porcelain pots in the next image. Due to my interest in rock art, I began incorporating rock art imagery in the ceramics. Thereafter, I took undergraduate and graduate ceramics classes at ASU, where we fired stoneware to cone 10, then again at MCC. |
|
Creating Bas-Relief Images on Clay. Below are two cylinder forms incorporating petroglyphs. The first is a lamp base with the McKee Springs panel image. The second is a bottle with three anthropomorph images from near the confluence of Butler Wash and the San Juan River. Both rock art sites are in Utah. The bottle is 21 inches tall, and the lamp base is 20. The lamp base won the "Marjon Ceramics Best Utilitarian Award" at the Mesa Community College Student Art Show.
Both pieces were created by producing a slab with the petroglyphs and then throwing the top and the bottom. The relief of the design on the slab is achieved by pressing the slab into a mold. I cut the designs into a large block of laminated wood. First I chalk the wood blocks, then trace a projected transparency of the rock art. This ensures a photorealistic result. The blocks are carved using a large industrial router with a 1/8 inch, two-flue straight carbide bit, then finished with Exacto knives. The rounded relief of the image is achieved by stretching a 2 mil plastic membrane (ordinary household garbage bag) over the clay slab. I use a metal rib to first smooth the clay and to join the plastic membrane and the clay slab, vacating any air pockets. The slab is rolled over a 4 or 6 mil plastic layer, which makes it easy to lift the slab and place it over the wood block. The slabs are about a quarter inch thick before pressing them into the molds. The 2 mil plastic layer stretches as the clay is pressed into the design, creating a rounded bas-relief. After pressing the clay into the design the thick plastic layer is peeled off the back and the clay is smoothed. Then several layers of newsprint are laid on the clay before a layer of plywood is added. The assemblage is now ready to flip over. This is the heaviest aspect of the process. It is also difficult to flip the assemblage without altering the impression. After flipping the slab the wood block is lifted off the clay. Then the thin layer of plastic is carefully peeled off in a single motion. Stopping at the midpoint of this motion will result in a discernable mark on the clay. It is also best to peel the plastic back at a near 180 degree angle. The design is then revealed. Sometimes the result is unsatisfactory and the process must be restarted. If the image is satisfactory, the clay slab is sized. The top and bottom lines are cut perpendicular to the surface, and, after about an hour of air drying (that's very dry Arizona desert timing), the cylinder bonding seams are cut at a 45 degree angle. A thick slip of the same clay is added to the bonding seams. Make sure that the lines are parallel and perpendicular. Sizing the circumference length must be exactive. I measure the plastic cylinder diameter and add one and one half times the thickness of the clay, then multiply times pi (3.14159) to determine the length of the slab. During the hour (in AZ) that the slab is drying, the top and bottom portions are thrown on a wheel. The top is thrown first, upside down, using a bat, and then removed from the wheel. The bottom is thrown and left on the bat and the wheel. Then the slab is carefully slid off the plywood and draped over an eight inch in diameter plastic cylinder. This is made possible by the newsprint layer, which prevents the clay from sticking to the plywood or the cylinder. The plastic cylinder must be longer than the height of the slab and have a squarely cut end. I slide the clay to match the end of the plastic pipe, place a piece of plywood against the end, and tip the cylinder into an upright position. When wrapping the slab into the bonding position it is important to avoid wrinkling the newsprint or getting it into the seam. More thick slip is added to the seam. I press the seam together using a metal rib. The clay cylinder with the plastic pipe inside is picked off the plywood and placed on the thrown base on the wheel. The base is thrown with a groove to accept the clay cylinder and the clay ridge forces the plastic pipe up. The top of the plastic cylinder is checked for centering before clay is turned up from the base and throw against the cylinder, bonding the two parts. I loosen the pipe and check for centering again before sliding it out. Pulling it up carefully avoids moving the clay cylinder off center. Then I remove the newspaper. Very thick slip is added to fill the inside of the interior cylinder seam as needed. Before the top is added, any throwing or trimming of the inside base seam must be completed. Now to the top. Only the utmost of care can assure that the top is dropped into a well centered position. This is the most difficult part of the process. The bat is cut away from the top and any remaining throwing of the top is accomplished. Also, the top and bottom can be immediately trimmed. The piece is then wrapped in plastic for slow drying. After drying and bisque firing the two pieces shown above were sprayed with a coat of Majolica (see glaze recipes). The designs were accentuated by removing the glaze from the relief areas. This was followed with another thin sprayed coat of glaze. Both pieces were fired to cone 7 in a reduction fire. |


 The
Sheep Kokopelli plaque was raku fired using a Blue Patina glaze with
added cobalt. A coat of red iron oxide was applied below the sprayed
glaze. The iron was wiped on with a wet sponge and then the piece was
rewiped with a wet sponge. This techniques results in a variable coat,
leaving a thicker coat in the depressed areas and little on the raised
design.
The
Sheep Kokopelli plaque was raku fired using a Blue Patina glaze with
added cobalt. A coat of red iron oxide was applied below the sprayed
glaze. The iron was wiped on with a wet sponge and then the piece was
rewiped with a wet sponge. This techniques results in a variable coat,
leaving a thicker coat in the depressed areas and little on the raised
design. 
